|
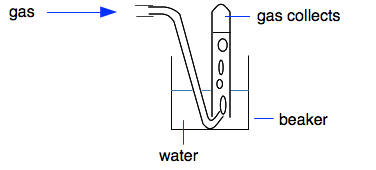
Chemguide: Core Chemistry 14 - 16 Collecting and testing gases This page looks at how you can collect and test samples of hydrogen, oxygen, carbon dioxide, ammonia and chlorine in the lab. It looks at four simple ways of collecting gases - over water, downward into a test tube or gas jar, upwards into a test tube or gas jar, and into a gas syringe. It then summarises the tests for these five gases - you may well be familiar with these already. We are not concerned on this page about how the gases are made. Collecting samples of the gases There are four common ways of collecting samples of a gas. Collection over water
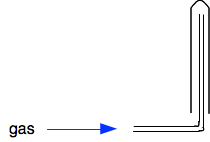
You can, of course, scale this up by using a gas jar. You obviously can't do this if the gas is soluble in water. Ammonia is extremely soluble in water, and chlorine is moderately soluble. You can't use this method successfully for those. Carbon dioxide is slightly soluble, and you will lose a bit of it going into solution, but it is fairly common to collect it this way. There is no problem collecting hydrogen and oxygen like this. Upwards into a test tube or gas jar
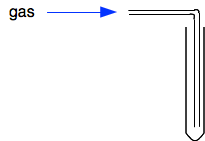
This only works if the gas is lighter than air. A heavier gas would simply fall out of the tube. You can use it for hydrogen and ammonia. Downwards into a test tube or gas jar
You can't use this for the light gases, but heavier ones like carbon dioxide and chlorine can be collected in this way. Oxygen has much the same density as air, and you can collect it like this if you want it to be dry. Otherwise you would choose to collect it over water. Collecting into a gas syringe
You can collect any gas this way, and would use it if you wanted to measure its volume. Once it is in the syringe, of course, there's nothing you can do with it without transferring it to a test tube using one of the other methods. Testing for gases Testing for hydrogen Hydrogen gives a squeaky pop if you put a lighted splint into it. Testing for oxygen If you put a glowing wooden splint into oxygen, the splint will relight. This is the test for oxygen. You can see that the splint bursts into a very bright flame again. It is possible that you might have noticed a slight pop as it relit. That is quite common, and it is important not to think that there is hydrogen there! The test for hydrogen is to put a lighted spint in and get a very squeaky pop. The pop with oxygen is more noticeable if you are using a bigger volume of oxygen. The next bit of video shows this happening, and explains why the pop happens. Most textbooks and teachers won't mention this. I am including it in case you get confused with the pop from hydrogen. What is absolutely important is that oxygen relights the splint. Hydrogen won't do that. For exam purposes, the test for oxygen is simply that it relights a glowing splint. Testing for carbon dioxide You test for carbon dioxide by bubbling the gas through lime water - calcium hydroxide solution. We say that the lime water turns milky. In fact, what is happening is that you get a precipitate of insoluble calcium carbonate.
If you bubble carbon dioxide through lime water for a long time, the precipitate disappears again. It reacts with more carbon dioxide to form calcium hydrogencarbonate.
If you are asked about this in an exam, just describe the first part of this - the formation of a milky precipitate. Testing for ammonia Ammonia is the only alkaline gas you will meet at this level. You can recognise ammonia because it turns damp red litmus paper blue. Although it isn't so commonly used, you can also test for ammonia because it forms white fumes of ammonium chloride if it comes into contact with hydrogen chloride gas. Hydrogen chloride gas is released from concentrated hydrochloric acid.
Testing for chlorine Chlorine is a bleach, and so turns damp litmus paper white. If you use damp blue litmus paper, it first turns red because chlorine reacts with water to form an acidic solution, but is then bleached. You don't need to know about the reaction being used to generate the chlorine.
© Jim Clark 2020 |


